
|
| ||
| Home | Login | Schedule | Pilot Store | 7-Day IFR | IFR Adventure | Trip Reports | Blog | Fun | Reviews | Weather | Articles | Links | Helicopter | Download | Bio | ||
Site MapSubscribePrivate Pilot Learn to Fly Instrument Pilot 7 day IFR Rating IFR Adventure Commercial Pilot Multi-Engine Pilot Human Factors/CRM Recurrent Training Ground Schools Articles Privacy Policy About Me Keyword:  |
 In this example, we are
using Visi-Plotter
to plan our cross country from Watertown Regional Airport (ATY) to
Wheaton Airport (ETH). The scenario is the pilot was requested to
plan a VFR cross country of at least 50NM for his Private Pilot
Checkride. In this example, we are
using Visi-Plotter
to plan our cross country from Watertown Regional Airport (ATY) to
Wheaton Airport (ETH). The scenario is the pilot was requested to
plan a VFR cross country of at least 50NM for his Private Pilot
Checkride.Step 1—Ensure the distance to your destination meets the requirements. In this case, it appears to be 57.5NM. Perfect.  Step 2—Draw the course line. Step 3—Add some meaningful visual checkpoints. Things that you’ll be able to see from the air are perfect. I’ve 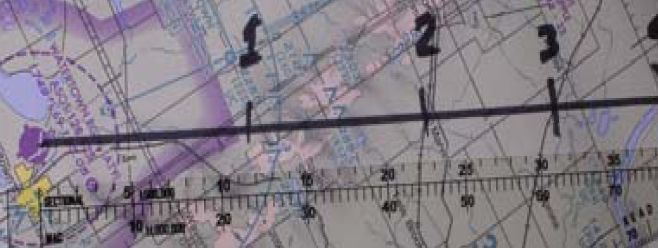 numbered them in
this diagram but it’s not necessary for you to do this step. Your
flight instructor may well instruct you to make your visual checkpoints
no more than 10NM apart. numbered them in
this diagram but it’s not necessary for you to do this step. Your
flight instructor may well instruct you to make your visual checkpoints
no more than 10NM apart.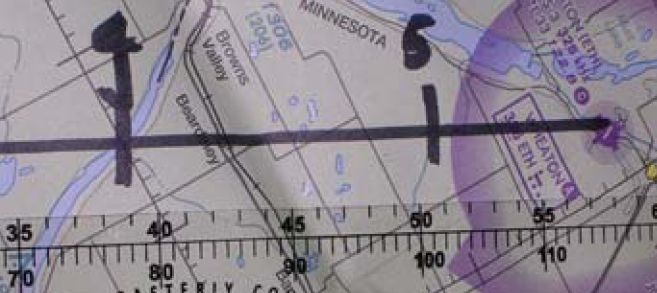 As you can see,
Checkpoint #1 is when the mountain is abeam the
aircraft on the left side at the 12NM point. Checkpoint #2 is
when the course crosses some power lines at the 23NM point.
Checkpoint #3 is when the course crosses some railroad tracks at the
31NM point. Checkpoint #4 is when the course crosses a river at
the 39NM point. Checkpoint #5 is when the course crosses a very
small river at the 51NM point. The destination, Wheaton, is at
57.5NM from the start of the cross country. As you can see,
Checkpoint #1 is when the mountain is abeam the
aircraft on the left side at the 12NM point. Checkpoint #2 is
when the course crosses some power lines at the 23NM point.
Checkpoint #3 is when the course crosses some railroad tracks at the
31NM point. Checkpoint #4 is when the course crosses a river at
the 39NM point. Checkpoint #5 is when the course crosses a very
small river at the 51NM point. The destination, Wheaton, is at
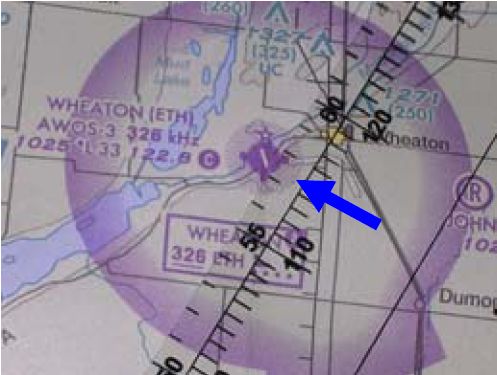
57.5NM from the start of the cross country.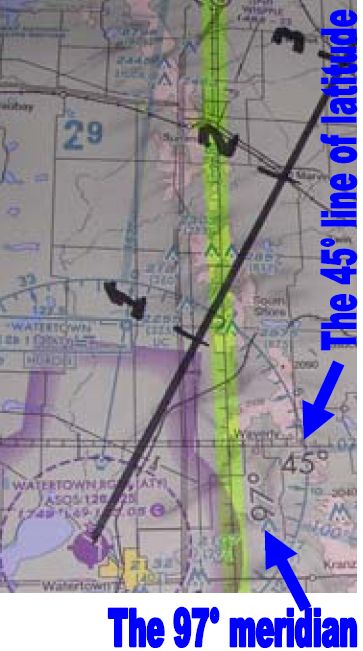 Step 4—Determine the True Course. This
requires aligning the
plotter with a line of longitude or meridian. I’ve highlighted
this line on the chart so you can easily see it. You are not
required to do this. See picture to the right. Step 4—Determine the True Course. This
requires aligning the
plotter with a line of longitude or meridian. I’ve highlighted
this line on the chart so you can easily see it. You are not
required to do this. See picture to the right. A. Align the plotter base line with the meridian. See blue arrow starting from the top left corner.  B. Next, align your course line directly under the hole in the plotter. C. Finally, read the true course along the protractor. In this case, you can see that the true course is 25°. I’ve circled it in blue so you can easily identify it. NOTE: Since you are going in an Easterly direction, you’ll always read from the top scale. 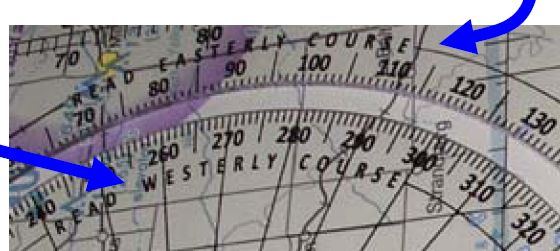 When you return back to Watertown
Regional (the home base of the aircraft), you’ll be heading in a
Westerly direction. In that case, you’d use the bottom set of
numbers. When you return back to Watertown
Regional (the home base of the aircraft), you’ll be heading in a
Westerly direction. In that case, you’d use the bottom set of
numbers. Step 5—Prepare your flight planning paperwork & fly your cross country. Step 6—Examiner throws a curve ball at you! Over Checkpoint #2, your examiner says divert to Milbank airport. The smart pilot you are, you notice the power lines go right to Milbank! Unfortunately, if you follow the power lines, you’ve failed the checkride. Thank goodness you read this!  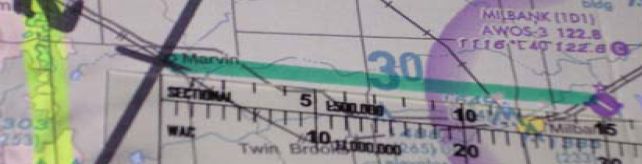 Step 7—Draw the
course line to the emergency divert airport. Make
a note of the mileage as well. Ok 15NM to get to Milbank
Airport. You'll need to find the Compass heading to get there so
extend the green line back to the meridian. Line up your plotter
and make note of the true course. In this case, the true course
is 095° to get to Milbank Airport. The problem is that True
Course is not a Compass Heading. Step 7—Draw the
course line to the emergency divert airport. Make
a note of the mileage as well. Ok 15NM to get to Milbank
Airport. You'll need to find the Compass heading to get there so
extend the green line back to the meridian. Line up your plotter
and make note of the true course. In this case, the true course
is 095° to get to Milbank Airport. The problem is that True
Course is not a Compass Heading. 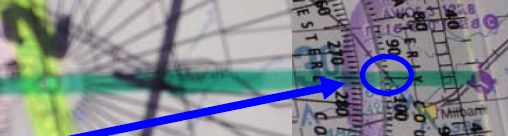 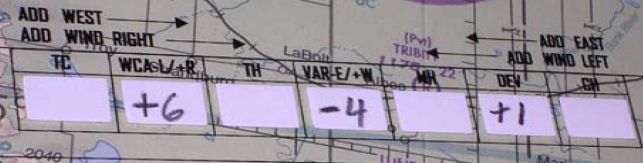 Step 8—Use the scratchpad to figure out the Compass
Heading. Your already figured out the Wind
Correction Angle
(WCA), Variation, and Deviation in your preflight cross country
planning. You already wrote those figures on your plotter just in
case this happened! Use your pencil to quickly figure out your
Compass Heading by putting in 095° and doing the math. Your
Compass Heading is 098°. Step 8—Use the scratchpad to figure out the Compass
Heading. Your already figured out the Wind
Correction Angle
(WCA), Variation, and Deviation in your preflight cross country
planning. You already wrote those figures on your plotter just in
case this happened! Use your pencil to quickly figure out your
Compass Heading by putting in 095° and doing the math. Your
Compass Heading is 098°. 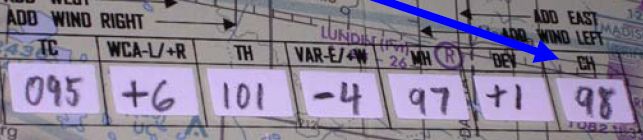 Step 9—Fly the Correct Compass Heading. Step 10—Figure out time & fuel to your divert Airport. Your examiner will want to know that you can quickly determine how much fuel & time it’s going to take to travel 15NM to your divert airport. Step 11—Pass your checkride! Thanks, Visi-Plotter! "Always
keep an 'out' in your hip pocket." — Bevo Howard
Your Thoughts... |

|
| Home | Login | Schedule | Pilot Store | 7-Day IFR | IFR Adventure | Trip Reports | Blog | Fun | Reviews | Weather | Articles | Links | Helicopter | Download | Bio |
| All content is Copyright 2002-2010 by Darren Smith. All rights reserved. Subject to change without notice. This website is not a substitute for competent flight instruction. There are no representations or warranties of any kind made pertaining to this service/information and any warranty, express or implied, is excluded and disclaimed including but not limited to the implied warranties of merchantability and/or fitness for a particular purpose. Under no circumstances or theories of liability, including without limitation the negligence of any party, contract, warranty or strict liability in tort, shall the website creator/author or any of its affiliated or related organizations be liable for any direct, indirect, incidental, special, consequential or punitive damages as a result of the use of, or the inability to use, any information provided through this service even if advised of the possibility of such damages. For more information about this website, including the privacy policy, see about this website. |
